Part III
Link servers into one fleet, then network, harden and monitor them all from a single window — Macs, Linux and BSD boxes, Raspberry Pis and Windows hosts alike.
Chapter 8
Connecting Servers: Locations & the Fleet
One Mac is a start. FrontierStack reaches out over SSH to every other server you run — and knows where on the network it is sitting when it does.
Everything so far has been about the Mac in front of you. This part of the manual widens the lens to the whole estate: the Linux boxes in a rack, a vintage Xserve still running macOS Server, a Raspberry Pi on a shelf, a cloud VPS, even a Windows host. You link each one once over SSH, and from then on FrontierStack treats them as a single fleet — running diagnostics, fanning commands out, deploying sites, and watching their health. It also keeps track of where this Mac is on the network, so a laptop that moves between home, office and a café doesn't fire false alarms about servers it simply can't see right now.
This chapter covers linking and running the fleet. Chapter 9 goes deeper on the network and perimeter, Chapter 10 on hardening and the security audits, and Chapter 11 on continuous monitoring and alerts. The AI Administrator can drive almost everything here over the same tools — see Chapter 13.
8.1Locations & Places
Open Locations & Places ▸ Locations. A location is simply a named network — Home, Office, On VPN — recognised from several signals: the Wi-Fi SSID, the router (gateway) MAC address, the Wi-Fi BSSID, the subnet prefix of your IP address (e.g. 192.168.1.), your public IP block, and whether a VPN is up. The header shows where you are right now (Now: Office), with the live snapshot beneath it: Wi-Fi name, IP, gateway and VPN state. Detection runs every 30 seconds.
When FrontierStack sees a network it doesn't recognise it offers a New network detected banner — click Add… to save it. You can also press Add Current Network as Location, then refine the criteria: a location matches when all the set criteria hold (with SSID and router MAC treated as any-of), so leaving a field blank simply ignores it. When several locations match, the most specific one wins rather than the first in the list. Use the Mode picker to pin a location manually instead of auto-detecting — handy when the signals are ambiguous.
Not all signals are equally trustworthy, and this matters more than it sounds. A subnet prefix is not an identity: home routers, cafés and hotels hand out 192.168.1.× everywhere, so a location defined only by its subnet would happily match a completely different building. The router MAC is the strongest signal — it is unique to one piece of hardware and readable without any special permission — which is why Update all criteria from current network is the one-click fix for a location that was saved before router matching existed.
8.17.1Pinning a place with GPS
For the awkward case — two sites that genuinely share a subnet and you would rather not fuss with MAC addresses — a location can also carry a GPS pin. Stand in the place, open the location and press Pin This Spot (GPS); a Radius slider sets how far counts as "here" (150 m by default, because indoor positioning is coarse and a site is a building, not a point).
The pin is a cross-reference, not a requirement. It does two things: it lets a weak match be confirmed, and — more usefully — it lets a wrong one be vetoed, so Home stops claiming a café that happens to use the same subnet. To keep that from ever making detection worse, a location identified only by shared criteria (a subnet, a VPN toggle) is no longer reported as confirmed when a position is available and contradicts it; you get Away / Unknown instead of a confident wrong answer.
Devices belong to Locations too. In Device Discovery, a monitored device's ⋯ menu ▸ Assign to Location places it at a specific site — or leave it Automatic, where it falls into whichever location owns its subnet. You can also set it from the device's own pane, and each location's row lists the devices assigned to it. Private subnets repeat between sites, so a device pinned elsewhere can land in a location by subnet; press its × in that list (or choose No Location) to remove it, and a matching subnet won't put it back. When the Mac arrives at a recognised location, FrontierStack checks those devices (skipping any seen recently, e.g. over VPN) and shows each one's status: green reachable, red if it should be here but isn't answering, and orange when it's on a Wi-Fi segment this Mac can't reach — usually a different access point or band, such as a 2.4 GHz-only sensor while the Mac is on 5 GHz. Orange means “can't verify from here”, not “gone”.
The point of all this is the Location-Dependent Monitoring section. Mark a device, Wi-Fi network, Cloudflare zone or watch as critical in Overview ▸ Alerts, then scope it here to Only at Office. That check is paused everywhere else: your NAS won't ring as DOWN from a hotel, and your home Wi-Fi won't alert as lost while you're at work. Paused items resume silently when you return. When the location itself changes, FrontierStack can post a local notification, send a "📍 Now at: Office" alert through your Messaging Gateways, or both.
get_location tool: the active location, how it was determined (pinned vs auto-detected), the live snapshot, and every configured location's criteria. It uses this to reason about whether a LAN-only service is reachable from where you are now, or whether you're away over VPN.8.2Linking a server over SSH
A server joins the fleet through the Link a Server sheet — reachable from a device's pane, from Device Discovery, or from the Cloud Servers and Remote Tools panes. Enter a name, the host or IP, the port, an SSH username (root, ubuntu, ec2-user…) and the login password. That password is used exactly once: the app installs this Mac's managed SSH key into the server's authorized_keys, then connects key-only from then on. Nothing is stored except the server's address — the password is discarded.
For a key-only server with no password login, expand Can't use a password? Install the key manually, copy the shown public key into the server's authorized_keys yourself, then link. Tick Also install the monitoring helper to set up the host monitor in the same step (covered below).
Linked servers carry a small green or red status dot for reachability. If it goes red with Permission denied (publickey) — typically after a server is reinstalled, or the key was never installed — the AI tool repair_ssh_access clears the stale host key and re-installs the managed key, using a one-time login password you keep as a vault secret. The password is read locally and re-installs key access; on success the dot turns green again.
The host's Status section also shows a Connection row: what actually carries the server's default route — the negotiated Ethernet rate (10 GbE, 2.5 GbE, 1 GbE), the Wi-Fi generation (Wi-Fi 7 = 802.11be, Wi-Fi 6E/6/5) with its channel width, or a VPN tunnel. It is read during the normal status probe on Linux, macOS and FreeBSD hosts, and reported by the host monitor agent (v1.17+) on agent-only hosts. The same row appears for This Mac, and on SNMP devices the Interfaces query now lists each port's negotiated link speed.
Each server also has a Connect via setting (in its Edit sheet) for interactive shells: plain SSH (default), mosh — which logs in over your SSH settings and then switches to its own UDP transport, so the session survives sleep, roaming and flaky links — or experimental SSH3 over QUIC/HTTP3, whose server can hide behind a secret URL on UDP 443. Open Shell and Open SSH honour the choice; probes and file transfers always stay on plain SSH. Both clients are in the Services catalogue (mosh via Homebrew, SSH3 via Go).
repair_ssh_access tool reads its one-time password from the local .env vault by name; the value is never sent to the AI model.8.3The managed key and the saved sudo password
Key access lets the app connect, but many useful operations — reading /var/log, editing Apache config, reloading a firewall — need root on the server. FrontierStack handles this with a per-host sudo password, saved in the macOS Keychain (never in plain files). It is captured automatically when you link a server, and you can set or change it later in the host's pane or in the Remote Tools target section (the Sudo password field).
When a root-only command runs, the helper primes sudo's credential cache with that saved password over the SSH session, then runs the command. If no password is saved, root operations fall back to passwordless sudo -n and simply report "needs sudo" when that isn't configured. Because secrets are referenced by name, you can keep several — for example a distinct MySQL password per server in the .env vault.
sudo -S over the encrypted SSH channel only when a root action actually runs, and they are never shown to the AI model or written to logs. Revoke one by clearing the field; re-enrol or re-key a single host without touching the others.8.4Fleet Run — one command across every node
Fleet & Remote ▸ Fleet Run fans a single operation out across all linked servers at once, or a selected subset, with a live per-host result. Pick your Targets (toggle hosts; the reachability dot shows which are up), choose an Operation, and press Run on N Server(s) — everything runs concurrently over SSH and each host reports back below, expandable to its full output.
Operations are OS-aware: a package update maps to apt, dnf, pacman, zypper, apk or brew depending on the host; a service restart tries systemd, then Homebrew. You never write per-OS commands by hand.
| Operation | What it does across the fleet |
|---|---|
| Update / upgrade all packages | Runs the host's package manager's update + upgrade. Confirmed before it fans out. |
| Install a package | Installs a named package (e.g. htop) on every selected host. |
| Restart a service | Restarts a named unit (e.g. nginx) via systemd or brew. |
| Check reboot-required | Reports which hosts are waiting on a reboot after updates. |
| Disk usage (df) | One-shot df across the fleet to spot a filling disk. |
| Uptime & load | Uptime and load average per host. |
| git pull a repo | Pulls a repository at a given path on each host — a quick deploy. |
| Custom command | Runs a verbatim shell command on every selected host. Double-check before fanning out. |
Fleet Run is the fastest way to spot drift: run Disk usage or Uptime & load to compare hosts at a glance, or use the file-checksum and health-check tools in Remote Tools (next) to find a config that's diverged across the fleet.
8.5Creating a container, here or on a server
Everywhere FrontierStack lists containers there is a Create Container… button, and they all open the same sheet: the Docker pane for this Mac, the same pane with a linked server chosen in the host picker, and the Docker tab of the Server Activity window. What you build runs on whichever target you started from — locally through the docker binary, or on a server over the SSH connection you already have.
Start from a preset or from blank. The presets cover plain images — nginx, PostgreSQL, MySQL, Redis, a throwaway Ubuntu shell — and every self-hostable service the app can run as a single container, such as n8n, Flowise, Langflow, Vaultwarden and Checkmk. Choosing one fills in its image, port, volumes and environment, all of which you can change. Services that need a docker-compose stack are installed from their own pane on this Mac instead, and the sheet names them so nothing looks missing.
| Field | What it does |
|---|---|
| Image | The image reference, with a menu of images already on the target. |
| Name | Optional, and checked against the names already in use there. |
| Published ports | Each has a This machine only switch that binds 127.0.0.1, so a port is not exposed to the network unless you say so. |
| Volumes | A plain name is a Docker-managed volume; a path starting with / is a folder on the target. |
| Environment | Any variable can be marked secret, so it is entered as a password and hidden from the preview. |
| Advanced | Restart policy, network, a command override, extra Docker arguments, and whether it runs in the background. |
Before anything happens the sheet shows the exact docker run line with secrets replaced by dots, and lets you copy it. Creating pulls the image first (unless you turn that off) and then runs it, streaming the output back into the sheet.
sudo docker when the SSH user is not in the docker group — the usual reason a first attempt on a fresh Linux box reports a permission error.8.17.2The Containers board as a monitor
The Containers pane is not only a list. It carries a status dot that rolls every runtime on this Mac into a single verdict, so a glance at the sidebar tells you whether anything needs attention. Green means everything installed is healthy; orange means something is stopped or still being probed; red means an installed engine is down, or a container is unhealthy, restarting, or exited with an error. A runtime you have never installed is not a fault — green therefore reads as “everything present is happy”, not “everything is running”.
The sections follow the same order as the services list: Apple Containers, Docker, Kubernetes, OrbStack, container machines, then Vagrant. Kubernetes appears here read-only, showing the clusters you pinned in Kubernetes Clusters; pinning and per-cluster actions stay in that pane, which watches whole clusters wherever they run rather than only what is on this Mac. Where a runtime is not installed, the button opens the pane that installs it instead of sending you to a download page.
The pin button in the header opens a small floating palette: a single status bar with the overall dot and a running count, above a short list of what is running, with anything set up but idle grouped under Waiting. It is deliberately tiny — something to leave in a corner of the screen while you work elsewhere. Clicking any row jumps the main window to it.
8.17.3Docker Swarm
Swarm is not a separate product to install — it is built into the Docker engine, which is why FrontierStack monitors it from the Docker pane rather than giving it a pane of its own. When the engine you are looking at belongs to a swarm, a Docker Swarm section appears listing the cluster's nodes (ready or down, whether one is draining, and which are managers) and its services with their replica counts — 3/3 when a service has every task it asked for, 1/3 when it does not. The Server Activity window's Docker tab carries the same thing as a Swarm segment, so you can read a cluster from any linked server.
The state comes from docker info, which the pane already calls for engine health, so a machine that is not in a swarm costs nothing extra to check. One rule of Swarm shapes what you see: only a manager may list the cluster. Ask a worker and its daemon refuses, so on a worker FrontierStack tells you that plainly rather than showing empty tables that look like a failure.
8.17.4Ready-made stacks
Some things are not one container but several that are useless apart. Install Stack…, on the Containers pane and in the Server Activity window's Docker tab, sets up a whole group at once. Four ship with the app: the *arr media stack (Prowlarr, which holds the indexer list the others read, plus Sonarr for series, Radarr for films, Lidarr for music, Readarr for books, Bazarr for subtitles and a download client), Monitoring (Prometheus, Grafana and node-exporter), a Media server (Jellyfin, optionally with Jellyseerr for requests) and Immich, a self-hosted photo library that genuinely needs four containers — server, machine learning, Redis and PostgreSQL.
You choose which members to include, where the config and media folders live, the user and group the containers write as, and a port offset that moves the whole stack clear of something already listening. Published ports bind to 127.0.0.1 unless you say otherwise. FrontierStack then writes a docker-compose.yml into the project folder and runs docker compose up -d. Compose is what makes a stack a stack: the members share a network and address each other by name, which is why Sonarr's indexer setting can simply be http://prowlarr:9696.
docker compose up -d again is the normal way to change a stack later — FrontierStack has not hidden anything from you.container CLI has no compose equivalent, and on a custom network it cannot yet resolve another container by a bare name, so the members could not find each other the way a stack needs.8.17.5Apple containers, and the GUI we recommend
On Apple silicon, macOS can run Linux containers natively through Apple's own container command, where each container gets its own lightweight virtual machine instead of sharing one big Linux VM. The Containers pane has an Apple Containers section for this: it lists what is running, starts and stops the container system, pulls images, and creates new containers, in the same shape as the Docker section above. Apple's tool is a command-line program, and FrontierStack installs it from its GitHub releases.
For day-to-day work with Apple containers we recommend Davit, an independent macOS app that puts a proper graphical front-end on that same container command — browsing containers and images, starting and stopping them and following logs, without having to remember subcommands. The Apple Containers section installs it for you through its Homebrew cask and opens it afterwards. Davit needs Apple silicon and macOS 15 or newer.
container CLI that FrontierStack drives, so the two always agree about what is running — but Apple's container must still be installed for either of them to have anything to talk to. Installing Davit on its own is not enough.8.6Remote Tools — per-node diagnostics
Fleet & Remote ▸ Remote Tools is a suite of SSH-driven diagnostics, distilled from real fleet-debugging work. Choose the target first — a pinned server, or Other (IP / host)… for an ad-hoc address that isn't a saved server (its sudo password persists in the Keychain too) — then the tool and its parameters. Read-only checks need no root; ones that read protected logs or config use the saved sudo password through the helper, and a few are marked mutating.
| Tool | Purpose |
|---|---|
| Ping · Traceroute · Whois | Basic reachability, path and registration lookups, run from the chosen node. |
| Net Info · Netstat | Interfaces and addresses; routing table, interface/protocol stats, active sockets. |
| Port Scan · Port Check · Web Check | Scan a range, test a single port, or fetch an HTTP/HTTPS endpoint and report the status. |
| TLS Inspect · TLS Expiry | Inspect a certificate; check expiry across selected nodes at once. |
| System Resources · Listening Ports | Load, memory and disk for the node; what's listening (optionally with sudo). |
| Tail Log · Config Test | Tail any log path; validate the web server's configuration. |
| File Diff · Healthcheck | Compare a file's contents across nodes (drift); hit a vhost's paths over loopback on each node. |
| rsync Deploy | Push a local folder to a remote path — with a dry-run preview and an optional --delete. |
| Security · SSH · Exposure · Auth · User audits | Read-only audits (see Chapter 10) on any node or ad-hoc IP. |
| Flush DNS · Restart Backend | Flush the resolver cache; kick the macOS Server web backend (mutating — sites blip). |
Some tools work across several selected nodes at once — File Diff, Healthcheck, TLS Expiry and Serving Path Diagnosis (who's up, which public IPs each node binds, per-process CPU saturation and stopped services, cross-checked against every pinned Cloudflare zone's origin IP) are fleet-wide by design — which is exactly how you confirm every web node is serving the same content with a valid certificate. The bottom of the pane also offers safe over-SSH editing of /etc/hosts (root, through the helper) and the SSH user's ~/.ssh/known_hosts, each backed up to .fsbak first.
8.7Recovering a wedged server — and a safe power reset without SSH
A server can stop answering SSH while its services keep running — overloaded, not down. FrontierStack shows this: when SSH is unreachable but a service port still answers (say MySQL on 3306), the server's dot turns orange, not red, and its pane reads "SSH is wedged, but the server is still serving" and lists what's answering, with the database's version banner. The machine is alive — only its management channel is stuck — so don't assume it's dead or blindly cut the power.
Try a normal Reboot first. After Reboot, the dot flashes while FrontierStack waits out a grace period and then polls, refreshing the instant the host returns — no need to keep pressing Refresh.
Make a power reset safe — without SSH. When a database is still answering, the pane shows a red-outlined EMERGENCY box, Prepare databases for a safe power reset. Each step runs over the database's own connection (no SSH), using the credentials saved in Database Health, top to bottom: Stop accepting writes (reads still work, reversible), Quiesce & flush to disk, then Clean-shutdown. After a clean shutdown a hard power-cycle is safe, because nothing dirty is left in memory to corrupt. Coverage differs by engine — MySQL, Redis and MongoDB can be cleanly stopped over their protocol; PostgreSQL can be quiesced and flushed but not stopped over SQL, so you flush then power-cycle. The clean-shutdown button is red and confirms first.
Power-cycle, then bring it back. The hardware power controls (SwitchBot plug, smart powerboard/PDU, KVM) each offer Shut Down Databases First in their confirmation, so you can flush and stop the databases before cutting power. And if the shutdown relieved the pressure and SSH recovers, a Start button starts the database again over SSH — so the ideal path is often: clean-shutdown the runaway database, let the box recover, and Start it, with no power-cycle at all.
8.8The Host Monitor (remote agent)
SSH diagnostics run on demand. For continuous visibility, install the Host Monitor — a tiny, read-only Go helper (fsagent) that lives on the server and reports its own health, with no per-cycle SSH. From a linked host's pane, choose to install it (or tick the box in Link a Server); over the existing key the app pushes the right binary for the host's OS and architecture, sets up the platform service (systemd, launchd or BSD rc.d), and pins its TLS certificate. The AI tool install_monitor does the same on request.
Once enrolled, the monitor streams live metrics: CPU, memory, per-mount disk, network interfaces up, detected services, firewall and fail2ban state — and on GPU hosts, per-GPU temperature and utilisation, so a mining or ML rig surfaces thermals. list_monitors reports the fleet's helpers, their versions and latest metrics. Crucially, the monitor keeps watching and can alert even when the Mac app is offline, notifying directly through its own channels and replaying anything it buffered when the app returns. Logs windows prefer the monitor too — it runs as root on the server, so it reads privileged logs without needing the sudo password at all.
An enrolled host's pane also keeps a Behavior & History chart — CPU, memory, disk and temperature at five-minute resolution for up to 30 days, against a learned baseline that flags unusual behaviour. Temperature uses its own degree-marked scale, so it remains readable beside percentage-based resource use. Vertical lines place incidents on the same timeline: a solid red line is a server reboot (derived from the reported uptime), a dashed orange line is a watchdog issue — a forced service restart, a database-corruption warning or a reboot escalation. If the OS crash reporter starts using CPU (a process crashing repeatedly), an orange Crashes curve joins the chart, so "MySQL was force-restarted twice last night and something was crash-looping" is visible at a glance.
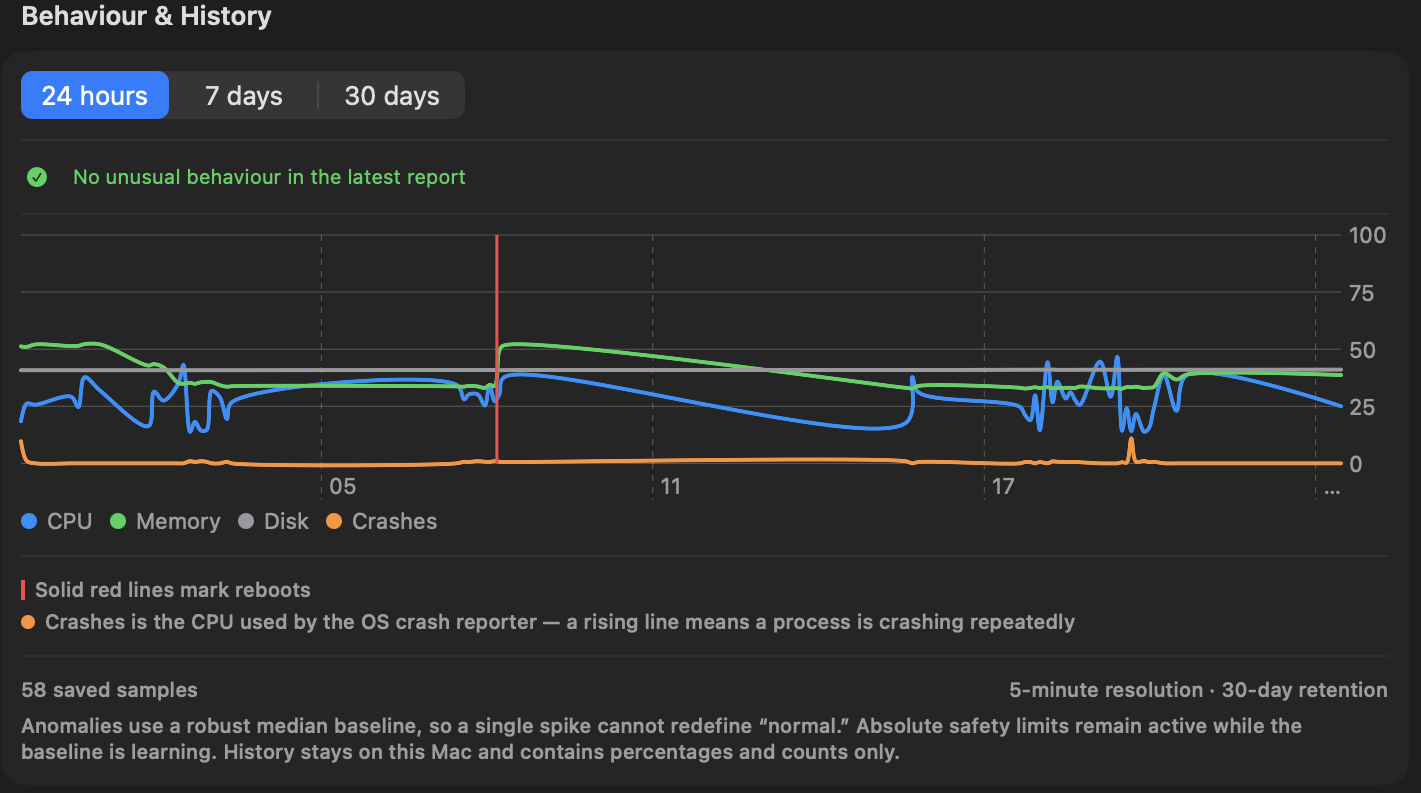
The monitor is read-only by default. Turning on Allow actions in its Host Monitor pane unlocks a small, fixed set of control verbs — never arbitrary shell — driven by the gated monitor_action tool: restart/reload/start/stop an allowlisted service, flush DNS, reload the firewall or fail2ban, or reboot. Each action is logged on the server. Targets cover Linux (amd64/arm64/arm — covering every Raspberry Pi), macOS (including legacy Intel builds back to OS X 10.11 El Capitan), FreeBSD (pfSense/OPNsense/TrueNAS) and Windows.
Keeping a monitor healthy over time is handled for you. Rotate monitor credential replaces its bearer credential in place: the new secret is generated on the Mac, sent over your approved FS1 signing key, and activated on the server without ever being shown or handed to an AI. With Allow self-update enabled, pushing a newer build is safe by construction — the candidate binary's release signature is verified, it must pass a compatibility self-test before it is given root, and the previous binary is kept as a rollback; if the new one fails to answer its health check, FrontierStack restores the old one automatically. Pull-mode updates fetch the binary through a short-lived, single-use grant rather than a durable token. When a monitor is verifying FS1-signed requests, its pane shows a FS1 signed badge.
8.9Cloud Servers, Server Clone & Remote Apache
Alongside the compute panes, AWS ▸ DynamoDB lists the tables in the selected region with their status, item count, size and partition/sort key. It leans on the two things that actually cost you: the capacity mode capsule separates provisioned tables — which bill for their read and write units continuously, whether or not anything touches them — from on-demand tables that bill per request; and a no PITR flag marks any table without point-in-time recovery, which is off by default on every new table and is the only way to rewind after a bad write. Point-in-time recovery can be switched on or off from each row's menu. DynamoDB has no bulk describe call, so each table is queried individually and the list is capped at 40 per region.
Fleet & Remote ▸ Cloud Servers rolls up one inventory across every cloud provider that has a configured API token — DigitalOcean, Vultr, Linode, Hetzner, Sakura, Contabo — plus AWS EC2, Lightsail and RDS. It is a read-only roll-up (power control stays in each provider's own pane). Each running instance with an IP offers a Services button to discover what's listening, and a + Helper button that links the instance over SSH and installs the monitor in one move — just set the right username and key in the sheet.
Server Clone is a guided wizard that stands a fleet server up to match this Mac: it installs the detected Homebrew stack, copies configs and site files to their original paths, pushes your domain configs and reloads the web server, and can clone MySQL databases (local mysqldump piped into mysql on the target over SSH). Every step runs over key-based SSH and is safe to re-run; existing data isn't deleted.
When a single site is ready to go live, the Promote to Production push (from a domain's context menu) sends its vhost config to the same path it uses locally, optionally copies the document root and database, points DNS at the target via Cloudflare, and can issue a real Let's Encrypt certificate with certbot — files, database, vhost, DNS and HTTPS in one push.
You can also manage a remote server's Apache directly. The Apache pane gains a host selector (This Mac / each linked server) when any remote host exists; pick a server and FrontierStack discovers its Apache over SSH — version, config layout, and every active vhost with its real log paths — and lets you edit vhosts, modules, MIME types, ports and WebDAV, with each change validated (httpd -t) and gracefully reloaded before it sticks, rolling back if the config is invalid. It even understands the legacy macOS Server.app Apache tree. From the Sites list, Push to Server… renders a local site's vhost onto a monitor-linked server with its document root swapped in. Chapter 7 covers the local Apache and Sites workflow these mirror.
8.10Screen sharing to a host
Each server's pane offers whatever remote-access method its probe detected — Apple Screen Sharing / VNC for a Mac, RDP for Windows, and AnyDesk, TeamViewer, RustDesk or NoMachine when their clients are present. When Apple Remote Desktop is installed on this Mac it registers the vnc:// handler and captures the click, so the pane offers a separate Screen Sharing (macOS) action that always opens Apple's built-in Screen Sharing client instead. If the host is reachable at more than one address — a LAN IP and a VPN or Tailscale address, say — that action becomes a menu so you pick which network to connect over; each choice dials the numeric IP directly, so it still works when the host's name isn't resolving (mDNS, split-horizon DNS, or a VPN quirk). A matching “— by IP” button appears for VNC and RDP whenever the pane would otherwise use a name that might not resolve.
8.11KVM-over-IP: console and power, lights-out
SSH and Screen Sharing need the machine to be up and on the network. When it isn't — a kernel panic, a BIOS/firmware screen, a network stack that never came up — you need out-of-band access: a KVM-over-IP appliance that captures the real HDMI output and injects USB keyboard/mouse, independent of the operating system. The Remote KVM pane registers as many of these as you own — PiKVM, JetKVM, TinyPilot, NanoKVM, GL.iNet Comet, or any generic unit — each pinnable, each one click from its web console down to the BIOS.
Units with power control close the loop. A PiKVM with an ATX board, a network PDU, or GL.iNet's Comet Pro (GL-RM10) — which is a KVM and a smart power plug in one device — can switch mains power, so you can hard power-cycle a truly frozen box. Link such a unit as a server's power source in its Power section (beside SwitchBot, UPS and PDU commands) for On/Off/Cycle. The AI Administrator can drive it too: list_kvms, kvm_power, and server_power — the last reaches a host's linked plug/PDU/KVM to restart a hung server that won't answer reboot_host.
8.12Boot Media: installing an operating system over the network
Reinstalling a server used to mean a trip to the rack with a USB stick. The Boot Media pane (Fleet & Remote) replaces the stick: you keep installer images in one library on this Mac, and FrontierStack presents the one you choose to the target machine as a virtual CD — through the server's management controller, a PiKVM, a Proxmox VE virtual machine's CD drive, or a network boot menu. Macs are handled differently, because Apple no longer lets them boot that way; see Macs below.
8.17.6The image library
Add ISO or Disk Image… records a local file; the file stays where it is and nothing is copied. Add Image URL… records an image that already lives on a web or file server (http, https, nfs or cifs) — a remote URL is handed straight to the target, so this Mac never has to carry the bytes. Compute SHA-256 records the file's checksum so you can compare it with the vendor's published one before installing anything from it. Each entry can be renamed, shown in Finder, removed from the library, or its served address copied with Copy Image URL. An entry whose file is no longer at its saved location is flagged as missing.
8.17.7The built-in media server
A management controller mounts an ISO by reading it over HTTP, piece by piece, for as long as the install runs. The pane's Media server serves the library's local images for exactly that: it supports byte-range requests and keep-alive, which virtual CDs need, and shows a log of recent requests and the bytes served per image, so you can see a controller actually reading. It starts automatically when a target needs a local image, or you can press Start Serving yourself.
| Setting | What it does |
|---|---|
| Stop serving after | 1, 3, 6, 12 or 24 hours, or Until I stop it. Every read restarts the clock, so a slow install is never cut off mid-way. Serving also stops when you quit FrontierStack. |
| Address in image URLs | Automatic uses the address this Mac uses to reach each target, so a controller on a separate management VLAN is given an address it can actually reach. Or choose one fixed address. |
| Port | 8742 by default. |
| Open Port… | Shown when pf or the Application Firewall is on and may block controllers. It opens the port after an administrator prompt. |
403. Each image is published at an unguessable 128-bit token URL, and only while serving is on. An installer ISO is not usually secret, but a customised image can contain keys or answer files, so leave the timer on rather than choosing Until I stop it on a shared network.8.17.8Server management controllers (Redfish)
Most rack servers carry a baseboard management controller that can present an image as a virtual CD. FrontierStack drives it through the standard DMTF Redfish API: Dell iDRAC 8 and 9, HPE iLO 4, 5 and 6, Lenovo XClarity Controller (XCC), Supermicro X12 and newer, and any other controller that implements standard Redfish virtual media.
- Add Controller and enter its address, port, username and password. The password is kept in the Keychain and sent only to the controller. Optionally link the controller to a fleet server so the two are shown together. Use an account with the Virtual Media and Control privileges.
- Read Controller discovers what it manages: each system with its model and power state, and each virtual CD slot with whatever is mounted in it now.
- Choose the System, the Virtual CD and the Image. Leave Boot from it once on to boot the CD a single time, after which the server returns to its normal boot order.
- Under Then, choose Don't restart, Graceful restart or Force restart, and press Mount (or Mount and Restart, which asks for confirmation first).
- When the install is done, Eject the virtual CD.
| Controller | Virtual media notes |
|---|---|
| Dell iDRAC 8 / 9 | Needs the Enterprise or Datacenter licence. |
| HPE iLO 4 / 5 / 6 | Needs iLO Advanced. |
| Lenovo XClarity (XCC) | Needs XCC Advanced or Enterprise. |
| Supermicro X12 and newer | Standard Redfish virtual media. X10 and X11 boards offer virtual media only in their own console, so mount the image there using a copied URL. |
| Other Redfish controllers | Anything that implements the standard VirtualMedia insert/eject actions. |
8.17.9PiKVM virtual media
A PiKVM can emulate a USB drive for the machine it is plugged into. Boot Media uses PiKVM's documented /api/msd interface, with the same PiKVM API account as its ATX power control (see KVM-over-IP). First copy an image to the PiKVM's own storage: a local file is streamed up with a progress bar, or the PiKVM downloads a remote URL itself. Free space is checked before the copy starts. Then connect a stored image As CD-ROM (for an ISO) or As Flash (for a raw .img), pick it in the machine's boot menu or use Power Cycle… (a hard ATX cycle, with confirmation), and open the console to follow the install. Disconnect Drive and delete tidy up afterwards.
8.17.10Proxmox VE virtual machines
For a virtual machine on Proxmox VE (connected as described in Proxmox VE below), choose the Node, the Virtual machine and the ISO storage, then the Source. Image from the library has Proxmox download the image into ISO storage itself (its download-url call), so a local image is fetched from this Mac's media server; ISO already on Proxmox uses one that is there. FrontierStack attaches the ISO to the VM's CD drive and can put the CD first in the boot order — the original order is remembered and restored when you eject. Finally choose to leave the VM as it is, start it, or reset it (a hard reset, which asks for confirmation).
The API token needs Datastore.AllocateTemplate and Sys.AccessNetwork for the download, and VM.Config.CDROM, VM.Config.Options and VM.PowerMgmt on the VM. The pane lists these beside the controls.
8.17.11Network boot (PXE / iPXE)
Machines with no controller and no KVM can still boot over the network. Turn on Serve an iPXE boot menu from this Mac and the media server also publishes an iPXE menu that SAN-boots any library ISO over HTTP, chains to netboot.xyz for its catalogue of installers, and offers an iPXE shell and boot from local disk. Download iPXE Boot Loaders fetches the official loaders from boot.ipxe.org (ipxe.efi, undionly.kpxe and the arm64 ipxe.efi) so UEFI HTTP Boot clients can load iPXE straight from this Mac.
What remains is telling your DHCP server where to send booting machines. Pick your DHCP server and press Copy Settings for a ready-made snippet:
| DHCP server | Use it when |
|---|---|
| dnsmasq | dnsmasq is your DHCP server; it also has a built-in TFTP server. |
| dnsmasq (proxy-DHCP) | Your router keeps handing out addresses and dnsmasq answers only the PXE clients. |
| ISC dhcpd · Kea | A Linux DHCP server you edit yourself. |
| OPNsense / pfSense | The firewall is your DHCP server; the snippet names its network-boot fields. |
| UEFI HTTP Boot (no TFTP) | The firmware downloads iPXE over HTTP from this Mac, with no TFTP at all. |
8.17.12Other KVM-over-IP units
JetKVM, GL.iNet Comet, NanoKVM, TinyPilot, Raritan, ATEN, Avocent, Lantronix and Adder units have no stable public API for virtual media, so FrontierStack does not pretend to drive it. Instead Copy URL starts serving and copies an image address the KVM can reach, and the pane shows where to paste it in that vendor's own console.
8.17.13Macs
A Mac cannot boot an installer ISO, and network boot is gone: Apple silicon has none, and Intel NetBoot lost its server in macOS Server 5.7 and is refused by T2 Macs at Full Security. So for Macs, Boot Media installs macOS the way Apple supports — by downloading Apple's full installer on the Mac itself over SSH and running it. Every remote Mac in the fleet gets a card (add Macs under Remote Servers first):
- Refresh reads its macOS version, whether it is Apple silicon, Intel or Intel with T2, the model, free space, the installers already present, and whether Content Caching is on.
- List asks Apple which full installers are available (
softwareupdate --list-full-installers); Download on the Mac fetches one in the background (--fetch-full-installer) with progress. - Install… runs
startosinstallin one of two modes: Upgrade / reinstall (keeps data) or Erase and install. On Apple silicon only a volume owner may start an install, so you enter an administrator user and their password; the password is passed tostartosinstallon standard input and never stored. - Turn On Content Caching (on this Mac or any fleet Mac) keeps a copy of Apple's updates and installers on the LAN, so every other Mac downloads them from there rather than from Apple.
- For an Intel Mac with a linked KVM, Internet Recovery… restarts it into Apple's own network recovery, after confirmation. Recovery has no Screen Sharing or SSH, which is why a KVM is required to drive it.
8.17.14From the AI Administrator
The AI Administrator and MCP clients reach Boot Media through the existing kvm tool: media_list (read-only) reports the library, the media server's state, each controller's power and mounted image, and each PiKVM's drive; media_attach mounts an image on a target — a controller or PiKVM by name, or proxmox:<vmid> — and with boot=true also restarts into it; media_eject removes it. Attaching, ejecting and restarting need Allow changes and always ask you to confirm (Chapter 13).
8.13Proxmox VE: live cluster status and guest power
A Proxmox VE host is a server full of servers, and SSH to the node alone does not tell you much about its guests. The Proxmox VE service page (Containers category; see Chapter 6) therefore talks to Proxmox's own API. Add Connection and enter a cluster or single node's address with an API token — the token ID in user@realm!name form and its secret, which is kept in the Keychain and sent only in the Authorization header. Proxmox's self-signed certificate is accepted only on a private address. A token with the PVEAuditor role is enough for status; power control and boot media need the extra permissions listed above.
Once connected, the page shows the cluster name, Proxmox version and quorum; for each node its CPU, memory, root disk and uptime; every VM and container with its state; and a usage bar for each storage. Each guest can be started, shut down or rebooted, and — after confirmation — hard-stopped or reset. Show in Server Activity and Boot an ISO… jump to the other two places Proxmox appears.
In the Server Activity window (Chapter 11) every node is a tile in the All Servers, Cluster and Everything layouts, with CPU, memory, disk and uptime sparklines and a line such as “5/7 VMs · 2/3 containers running”. A node's detail shows its KPIs, a CPU and memory chart, the guest list with the same power controls, its storage and the cluster facts, plus Open Web UI, Refresh and Boot an ISO….
Alerts watches each connection in the background, refreshing about every five minutes: API reachability, each node's online state, cluster quorum, and any storage more than 90% full. The AI Administrator has the same view through the kvm tool's proxmox_status action (read-only) and can change a guest's power with proxmox_power, which always asks for confirmation.
PVEAuditor is enough; add the VM and datastore permissions later if you decide to boot installers from here.8.14Old Macs, Raspberry Pis & Windows hosts
Part of the point of a fleet is keeping older or odd hardware useful. A vintage Xserve or Mac mini still running macOS Server links like any other host; the Remote Apache discovery understands Server.app's own Apache tree and its internal ports, so its websites show up and can be edited, and the legacy Intel builds of the monitor run as far back as OS X 10.11 El Capitan. A shelf of Raspberry Pis links as ordinary Linux boxes — the monitor's arm build covers every Pi including the Zero — so you watch their CPU, disk and services right alongside everything else.
Windows hosts join over Microsoft's OpenSSH server: link them like a Linux box for SSH diagnostics, and install the monitor as a native Windows Service (because Windows services don't reliably inherit machine environment, its config is read from a file beside the executable). Windows monitor installs are done manually with the supplied PowerShell installer from the Host Monitor pane, rather than auto-pushed.
For interactive control beyond diagnostics, the catalog also carries the remote-access tools — RustDesk, MeshCentral, Apache Guacamole, Windows Remote Desktop and WinRM — but those are services you run, not the SSH fleet itself. The fleet's strength is uniform, scriptable, low-overhead management of everything from one window — and, with Chapter 13's run_script targeting any node by name, an AI that can diagnose and fix a remote server two steps at a time: a read-only test, then a minimal fix, re-run to confirm.
8.15OpenCore Legacy Patcher Macs: is it safe to update?
Some of those older Intel Macs will be running a macOS newer than Apple ever shipped for them, courtesy of OpenCore Legacy Patcher (OCLP). That changes what a reboot means. An ordinary server Mac boots power → macOS → FrontierStack agent; an OCLP Mac boots power → firmware → EFI/OpenCore → macOS → OCLP root patches → FrontierStack. Every extra link is a place where an unattended boot can stop: a macOS update replaces the sealed system volume and takes the root patches with it (Wi-Fi, graphics acceleration and Bluetooth vanish until they are re-applied), a major upgrade needs a matching OCLP release first, and if the firmware's startup entry ever stops pointing at OpenCore the machine sits at a boot picker until someone holds Option and chooses “EFI Boot” — considerably more troublesome when that Mac is in another building.
The OpenCore Patcher pane (Fleet & Remote) exists so you know this before you press Update. Pick This Mac or a linked Mac and it runs a read-only probe — the OCLP app version, OpenCore's NVRAM stamp (only present when the Mac actually booted through OpenCore), the root-patch receipt, bless --getBoot, SIP, Software Update settings, the real model behind OpenCore's spoofed one — and turns it into a Remote boot safety list: firmware boot entry → OpenCore, default boot volume set, FileVault's effect on unattended reboot, root patches present and current, OCLP release supports the installed macOS (checked against the newest GitHub release), pending macOS update, automatic macOS installs off, and an EFI/OpenCore backup. Above it sits one verdict: Safe to update macOS, Update with caution, or Not safe, with the reasons.
The pane deliberately does not administer OCLP — building OpenCore and applying root patches stay in OCLP's own app. It offers three fixed, reversible admin actions: turn off automatic macOS installs (so System Settings never updates an OCLP Mac unattended), back up EFI (an archive of the EFI/OC folder kept on that Mac), and re-bless OpenCore (the same bless --setBoot OCLP's “Install to disk” runs, refused unless OpenCore.efi is really there). The fleet status probe also notices OCLP on every pinned Mac: the host row and the Server Activity window show it, and Alerts raises a Security item when root patches are missing or the boot entry bypasses OpenCore.
diagnose ["oclp"] returns the full report, and its scripts refuse to install a macOS update — or reboot a Mac whose boot entry bypasses OpenCore — until the pane's verdict is safe. So when you ask “why did Wi-Fi disappear after I updated this Mac?”, it reasons from OCLP = true, the real model, a recent update and root patches = missing, rather than from the diagnosis it would give an officially supported Mac.8.16Migration wizards: moving a stack onto a new device
Retiring an old server rarely means "reinstall everything by hand." FrontierStack ships guided migration wizards that lift a stack off a legacy machine and stand it up on a destination you choose — this Mac, another Mac, or a Linux box. The source is only ever read; everything is written to the target.
The Migrate Setups pane handles a MAMP, XAMPP or Apple Server.app web stack. It auto-detects the source, then lets you tick exactly what to carry: the Homebrew tools, web files, MySQL databases, the sites (vhosts), MIME overrides, Apache modules, PHP settings, WordPress wp-config.php fix-ups and Git repositories. A Set up on picker chooses the destination: leave it on This Mac for the full in-app migration, or pick a linked host to install the stack on that new device over SSH, copying the web files (rsync) and databases (dump over SSH) across — with a Linux toggle to use apt/dnf instead of Homebrew.
The pane's Servers section also has Import from a Repo…: point it at a folder or git repo that holds an SSH config, an Ansible inventory or .env files, and it adds the servers to your fleet and the credentials to Script Secrets or the matching service, after you review them. FrontierStack AI can read other layouts without ever seeing a value (Ch 13).
The Apple Server Migration pane is a one-click wizard for a whole Server.app machine. Point it at the source (this Mac or a remote one) and it inventories every service with serveradmin — Websites, Mail, Calendar and Contacts, Messages (XMPP), VPN, DNS, DHCP, NetInstall, Open Directory, File Sharing, Time Machine, Profile Manager and more — and anything else it finds running, such as a git server, databases, Docker or a standalone Nginx. Each service shows a status badge and a modern equivalent; where there's more than one sensible replacement (Calendar → Radicale / SOGo / Baïkal, VPN → WireGuard / strongSwan, DHCP → dnsmasq / Kea) you choose which one. Pick a target machine and OS, and the wizard installs the equivalents and prints a precise carry-over checklist. Services with dedicated importers — Websites (full vhost + file copy) and Open Directory (users and groups) — hand off to their own panes; a detected git server hands off to the Git Server migration.
serviceproxy, and on older releases — High Sierra especially — that process wedges: it carries on accepting connections but stops answering them. Ping succeeds, the port scans as open and SSH still works, so the sites look reachable while every one of them hangs. It is routinely misdiagnosed as a DNS or network fault for exactly that reason, and a plain “is the service running?” check will not catch it either, because the process never dies. Give the source machine a Service Guardian watch on http://127.0.0.1/ with service serviceproxy (use server-httpd to watch the backend behind it) so a wedge is spotted and healed with launchctl kickstart while you plan the move. Migrating the sites to a plain Apache removes the wedge-prone proxy from the serving path for good.serveradmin as root, so save that host's sudo password in its settings first (Chapter 8, "The managed key and the saved sudo password"). Some Apple services carry their config automatically (DNS zones, Apache vhosts, Postfix main.cf); others install the replacement and hand you the steps — the wizard labels each one Automatic, Assisted or Manual so there are no surprises.8.17The Git Server: Gitea & repository migration
The Git Server pane stands up a self-hosted Gitea (behind Caddy for automatic HTTPS) on any target — this Mac, a linked server, a NAS, a Docker host or a Linux box — detecting the platform and installing the right way. Once it's running, connect with an access token for a live monitor: version, repository count and backup-staleness alerting when a mirror falls behind its source.
The same pane migrates or mirrors another Git server into Gitea. Point it at on-disk bare repos — the legacy macOS app Simple Git Server, Xcode Server, Gitolite, a plain git-daemon, or any folder — or at a running remote server via any git://, https:// or ssh:// clone base (enumerate the repo names over SSH, or paste them). Scan lists the repositories; Migrate mirror-clones each one with full history, every branch and tag, and pushes it into Gitea, creating the destination repo through the API. The copy runs on this Mac.
FrontierStack User Manual · Version 1.0.0 · Chapter 8